The HTML Table Generator turns a table you copy out of Excel or Google Sheets, or save as a CSV file, into clean HTML table code for a web page, a WordPress post or an email. You fix the cells in a table that looks like a spreadsheet, pick one of 206 designs, and copy the code with one button. Everything runs inside your browser, which means the numbers in your table are not sent anywhere.
The Blueprint: Where Each Part of the HTML Table Generator Sits
Putting a table on a website is a small building job. There is groundwork (getting the data in), framing (rows, columns and merged cells), finish work (colors and a design), wiring (the code itself) and a handover (pasting it into your page). This guide walks through the job in that order, so you can stop at the phase you need.
Say you keep the sign-up sheet for a community garden in Portland, and the plot fees live in a Google Sheet. The club website needs the same three rows as a real table, not a blurry screenshot. That is the job we will build. The picture below shows the generator with its own example loaded, a twelve-row sales table, so every part has something to show.
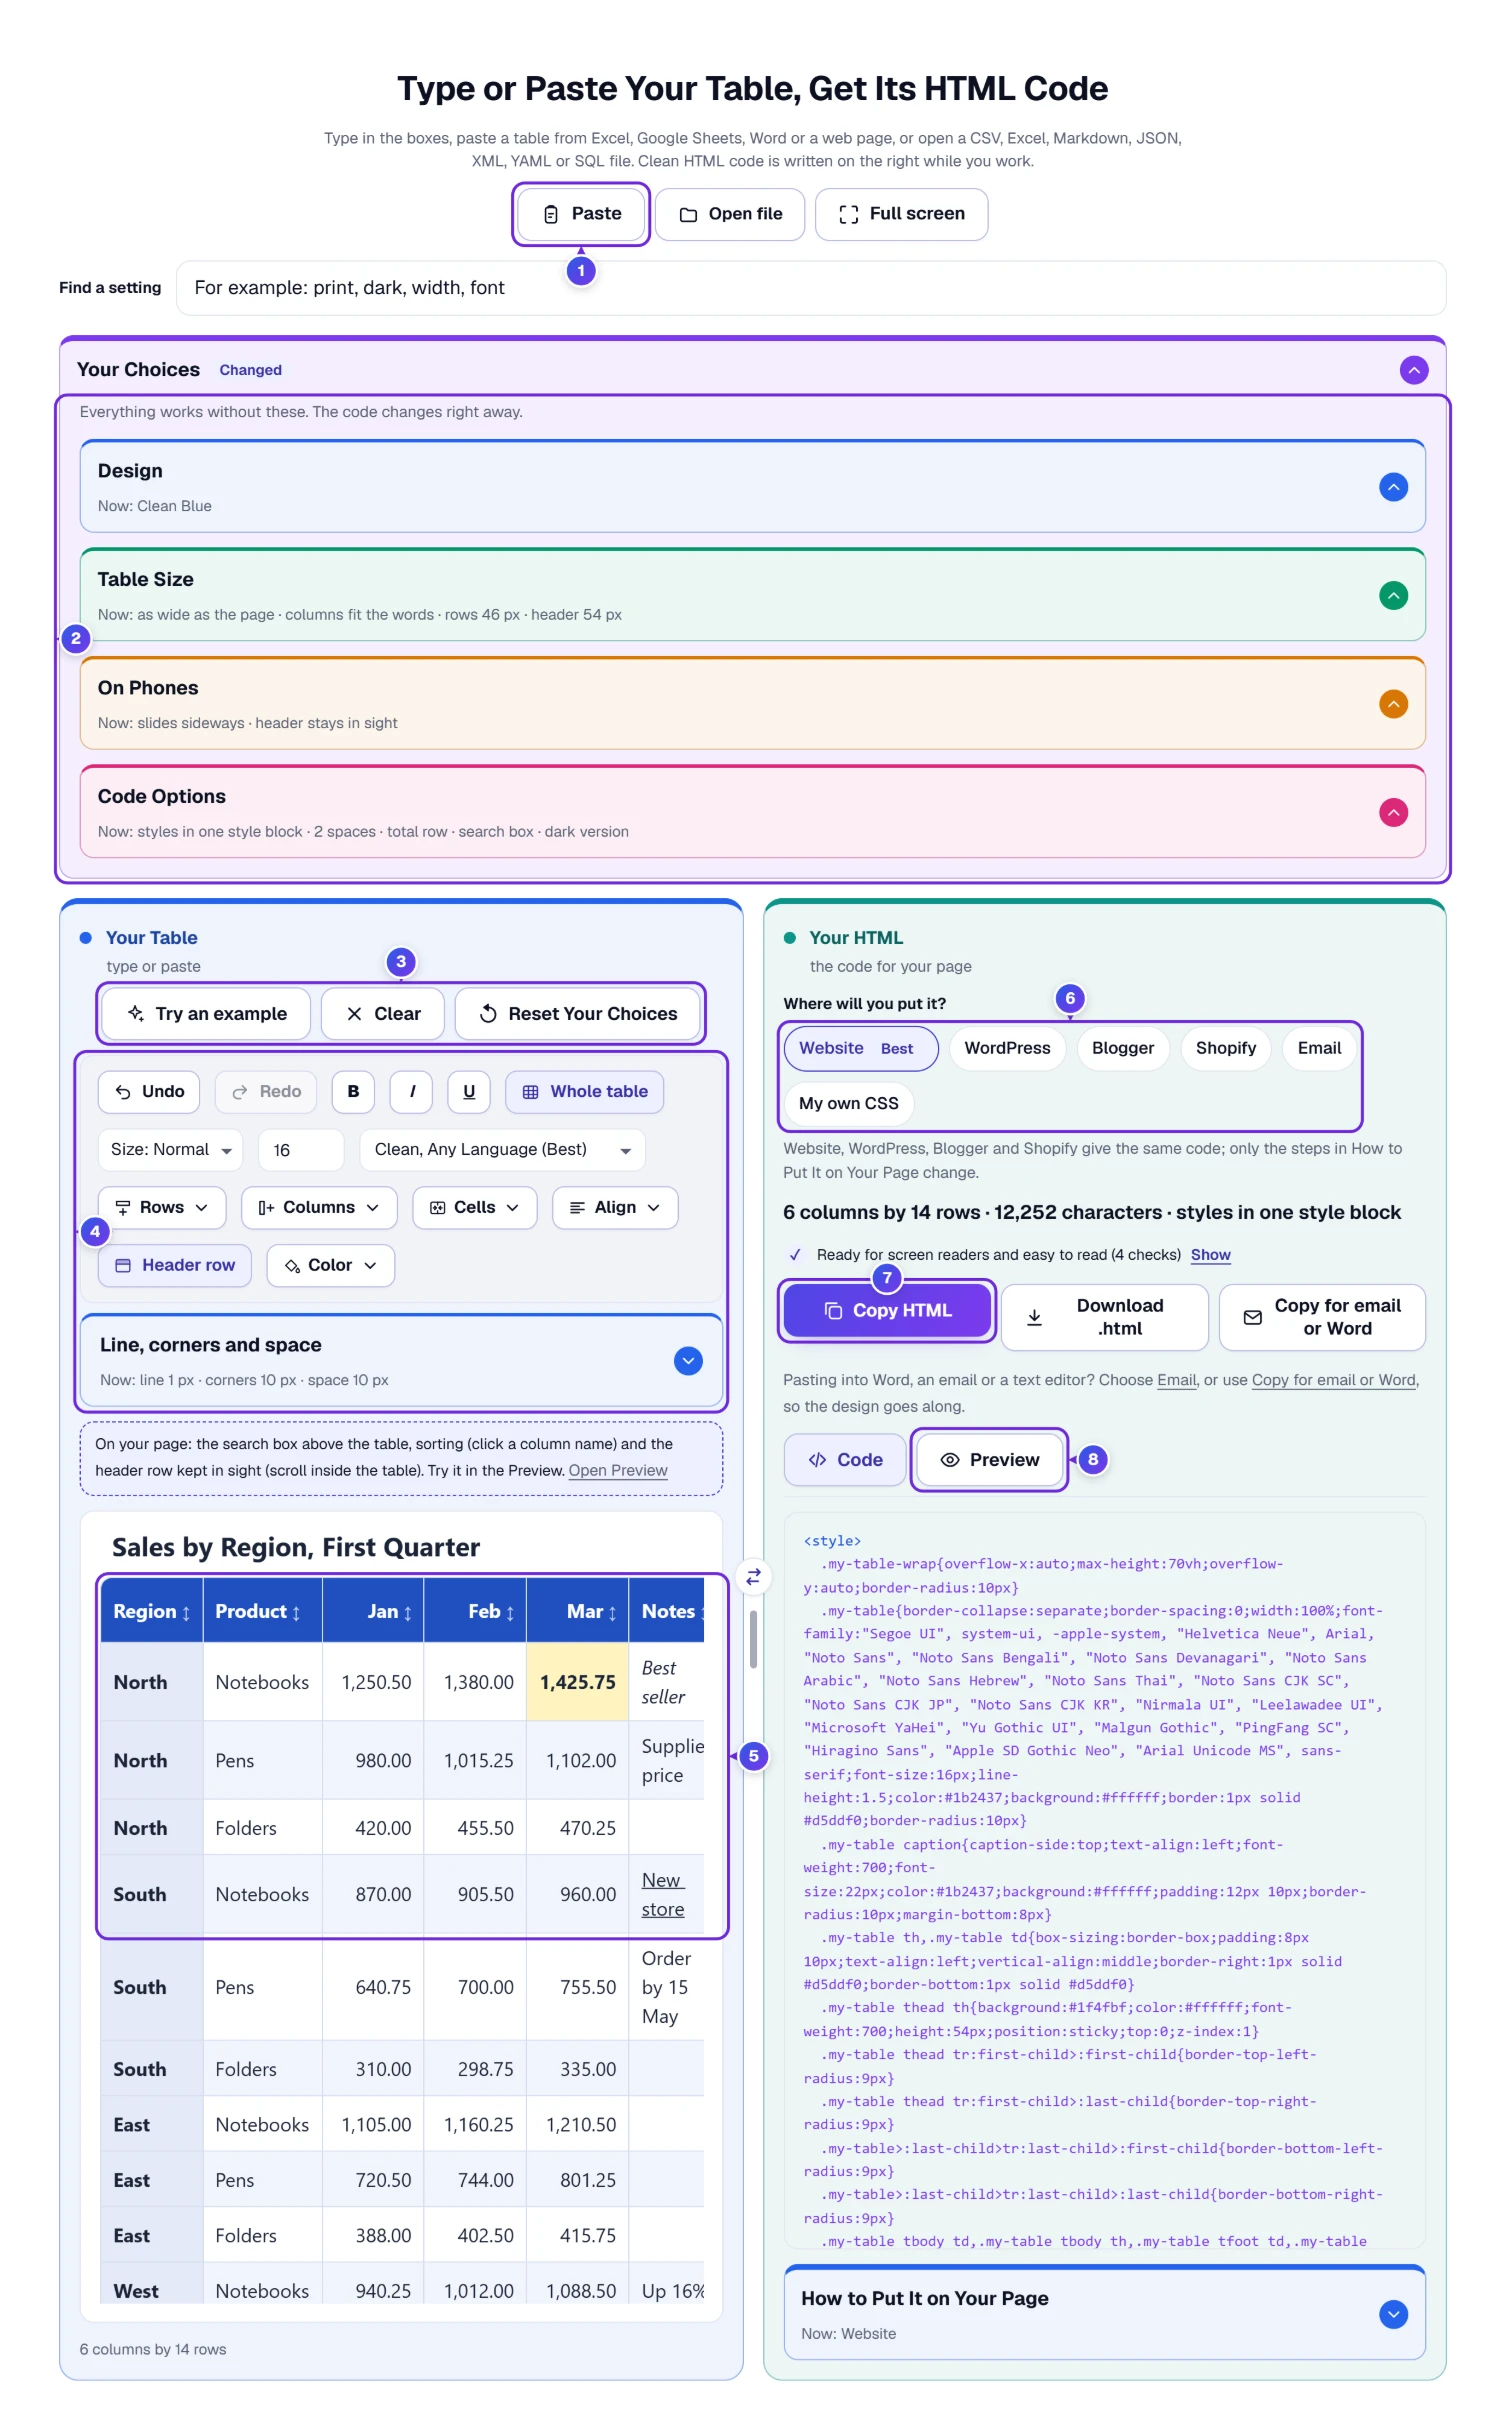
- 1 Paste puts in the table you copied. Open file sits next to it, and Full screen gives both sides the whole window.
- 2 Your Choices is open from the start: Design, Table Size, On Phones and Code Options sit in it, each with its current setting written under the name.
- 3 Try an example, Clear and Reset Your Choices give you a sample, an empty table or the default settings.
- 4 The toolbar edits the table: undo, bold, size, font, the Rows, Columns, Cells and Align menus, the header switch and colors.
- 5 Your Table is the table itself. Click any cell and type, the way you would in a spreadsheet.
- 6 Where will you put it? tells the generator if the code goes on a website, WordPress, Blogger, Shopify or into an email.
- 7 Copy HTML copies the finished code.
- 8 Preview shows the table the way a browser will show it on your page.
- Copy the cells in Excel or Google Sheets and press Paste (Ctrl+V on Windows, or Cmd+V on Mac, does the same).
- Under Where will you put it?, pick where the table goes.
- Press Copy HTML and drop the code into your page’s HTML view.
That is the whole job for most tables. The rest of this guide is for the moment you want a merged header, a different look, a table that behaves on phones, or code that survives an email.
Groundwork: Bring in the Data From Google Sheets, Excel or a File
An HTML table maker is only as good as the data you feed it, so the first phase is getting your cells in without retyping them. You have four ways in, and all of them show up in the empty table after you press Clear.
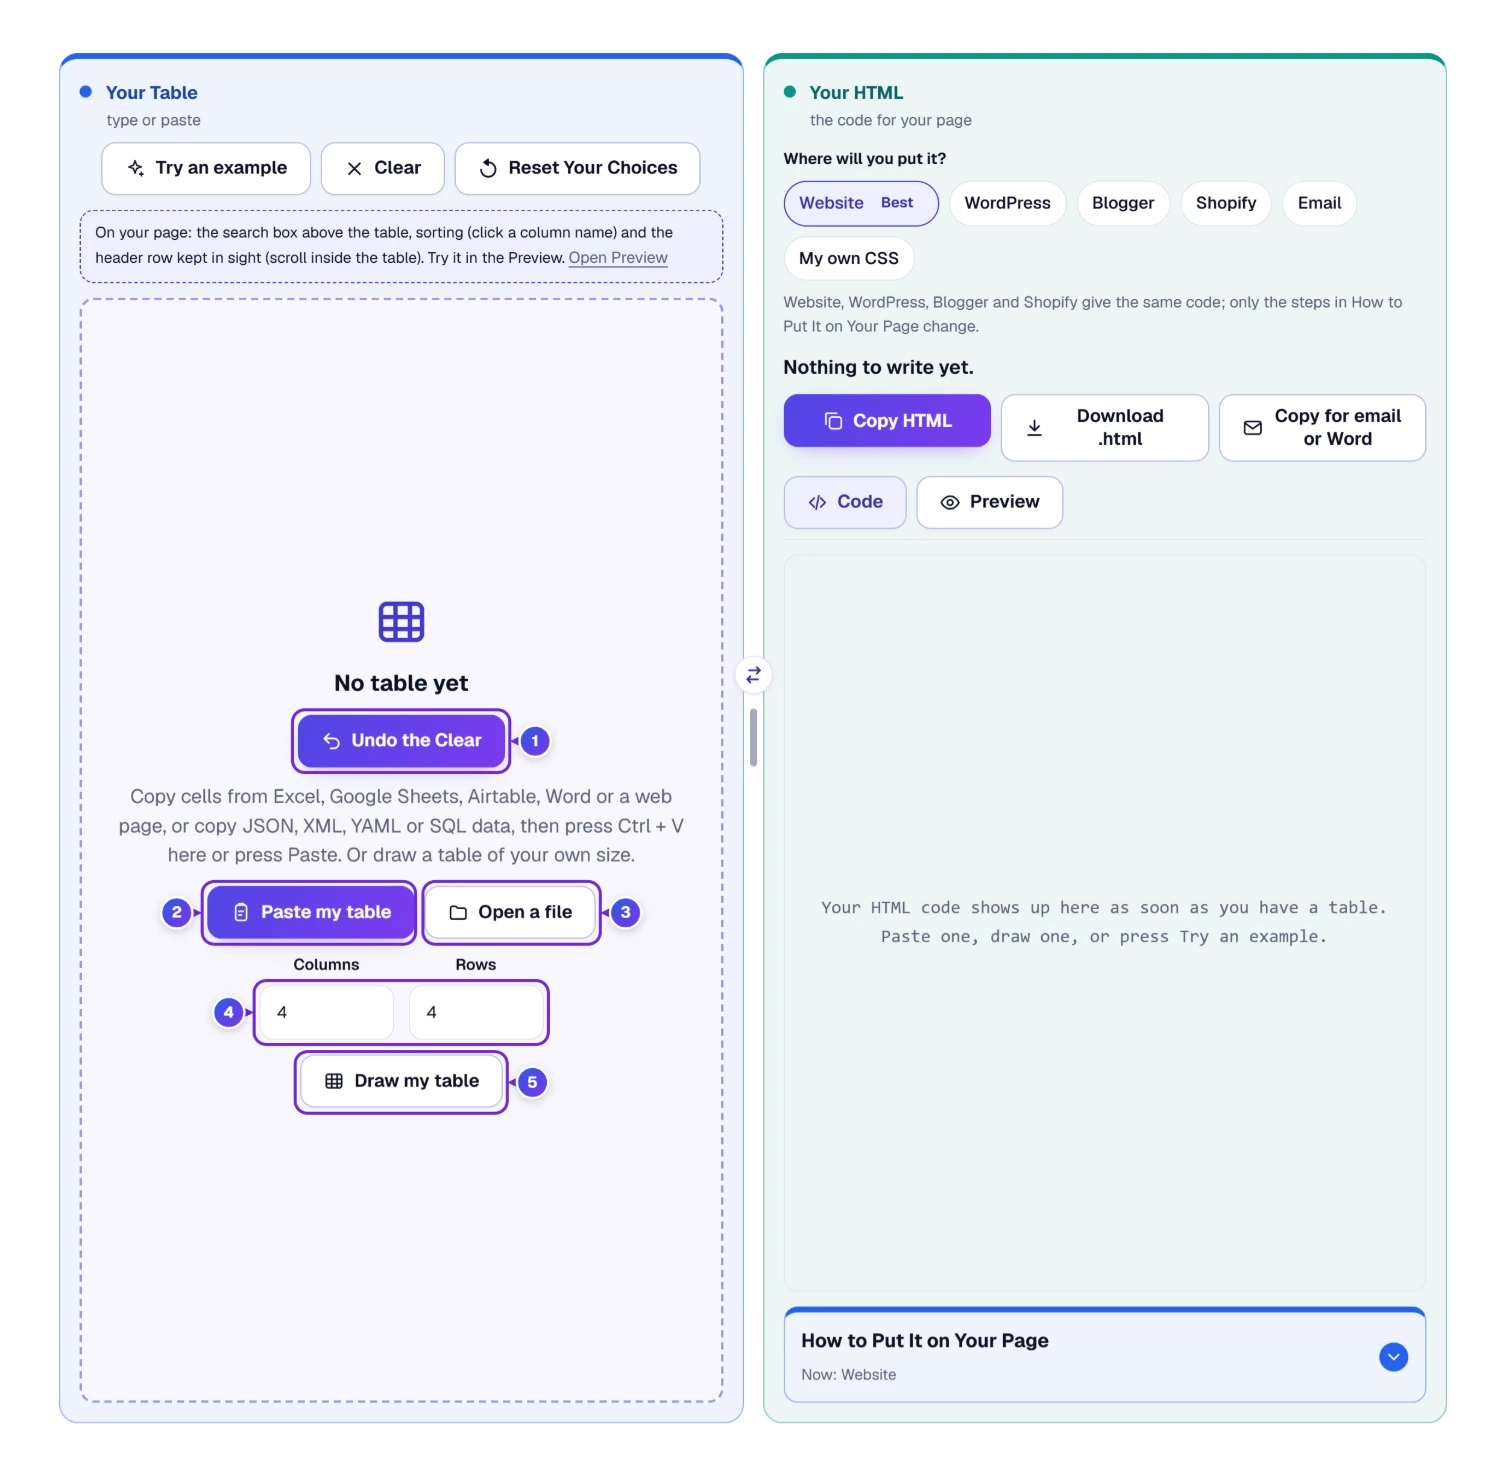
- 1 Undo the Clear brings back the table you just emptied.
- 2 Paste my table reads what you copied last. Some browsers ask for permission first; Ctrl+V always works.
- 3 Open a file picks a file on your computer.
- 4 The Columns and Rows boxes set the size of a blank grid.
- 5 Draw my table builds that grid, ready for typing.
We tested a paste the way a spreadsheet sends it, as tab-separated text: a short shopping list with Item, Qty and Price columns and prices such as $14.99. The message said “Pasted: 3 by 4 (columns by rows)”. The first row turned into header cells on its own, and the Qty and Price columns lined up on the right, because every cell in them is a number. A dollar sign doesn’t stop that. A table copied from Word or from a web page goes in the same way.
The file button reads more than spreadsheets. Here is what it opens, and what each file type turns into.
| File you open | What the generator does with it |
|---|---|
| Excel (.xlsx) | Opens the first sheet and lists the other sheets as buttons, so you can switch |
| CSV or TSV | Reads quoted commas and line breaks inside quotes the standard way |
| Markdown | Keeps the left, center and right alignment set by the colons in the dashes row |
| JSON or JSON Lines | One row per record and one column per field name |
| XML | Uses the element that repeats most as the row |
| YAML | Reads a list of records |
| SQL | Reads INSERT … VALUES statements; NULL becomes an empty cell |
| A web page (.html) | Finds every table; with more than one, a message asks which to use |
A deliberately messy CSV. We wrote a file called league.csv with a header that holds a comma (“Wins, 2025”), a city written as “Portland, OR”, a line break inside one cell and a quote typed as two double quotes. It opened as 4 columns by 3 rows. The header stayed in one piece, the city stayed in one cell, the line break became a <br> in the code, and the doubled quotes became one pair. That is how the CSV standard (RFC 4180) says a file should be read, and many quick converters get the comma inside quotes wrong.
An Excel decimal trap. An .xlsx file can keep a number such as 8.2 as 8.199999999999999 behind the scenes, even though Excel shows 8.2. We opened a two-sheet roster file with that exact value. The generator now rounds such numbers to 15 digits, the way Excel displays them, so the cell reads 8.2. A value saved as 13.0 shows as 13, which is also what Excel’s General format shows.
Only the first 30 columns and 300 rows fit. We pasted a 35-column sheet to check, and the message said so plainly: “Only the first 300 rows and 30 columns fit, so the rest was left out.” Split a bigger sheet into two tables.
PDFs are the exception people run into most: they won’t open. The message lists the types that do, and a file with no rows in it gets “We could not find a table in that file.”
Framing: Add, Move and Delete Rows and Columns
Once the data is in, the structure often needs a small fix: a missing row, a column in the wrong place, a blank line from the sheet. The Rows and Columns menus do this without going back to Excel.
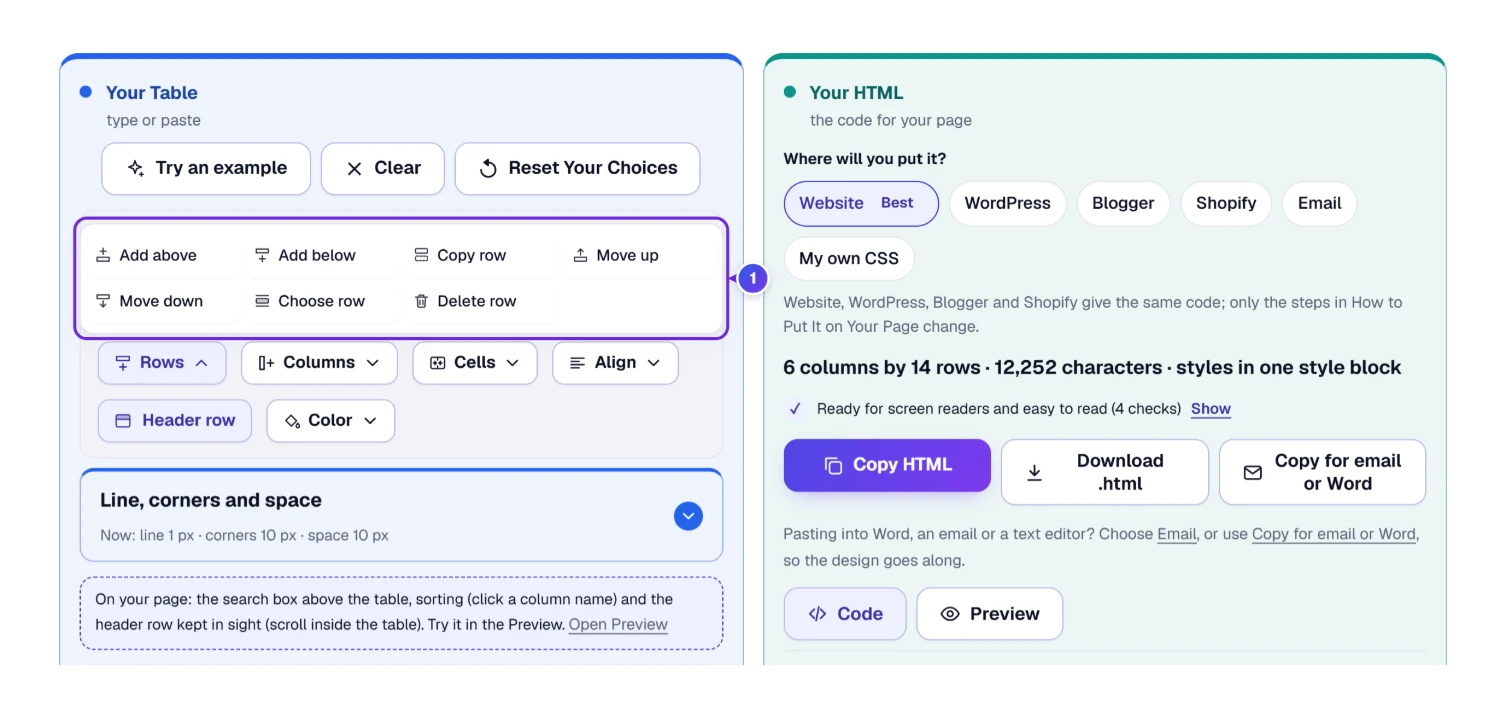
Click a cell first, then open Rows 1. From there you can add a row (Add above or Add below), duplicate it with Copy row, shift it with Move up or Move down, select it with Choose row, or remove it with Delete row. The Columns menu beside it works the same way sideways: Add left or Add right, Move left or Move right, then Choose column and Delete column.
- Click a cell in the row or column you want to change.
- Open Rows or Columns and pick the action.
- Made a mistake? Press Undo (key U). Redo (key Y) puts it back.
One paste that surprised us. If the table already has cells, a second paste doesn’t replace it. It pastes from the cell you clicked, like a spreadsheet does, and any old column to the right stays. We pasted a 4 by 4 block into a wider table and got “Pasted 4 by 4 cells, starting from the cell you clicked” with the old fifth column still there. For a fresh start, press Clear first, then paste.
Merged Cells and Header Cells, Without Typing Colspan
A merged cell spans two or more columns or rows, like a “Q3 Budget” title over two columns. In HTML that is written with colspan and rowspan, and getting those numbers right by hand is where most hand-made tables break. Here you choose the cells and press a button.
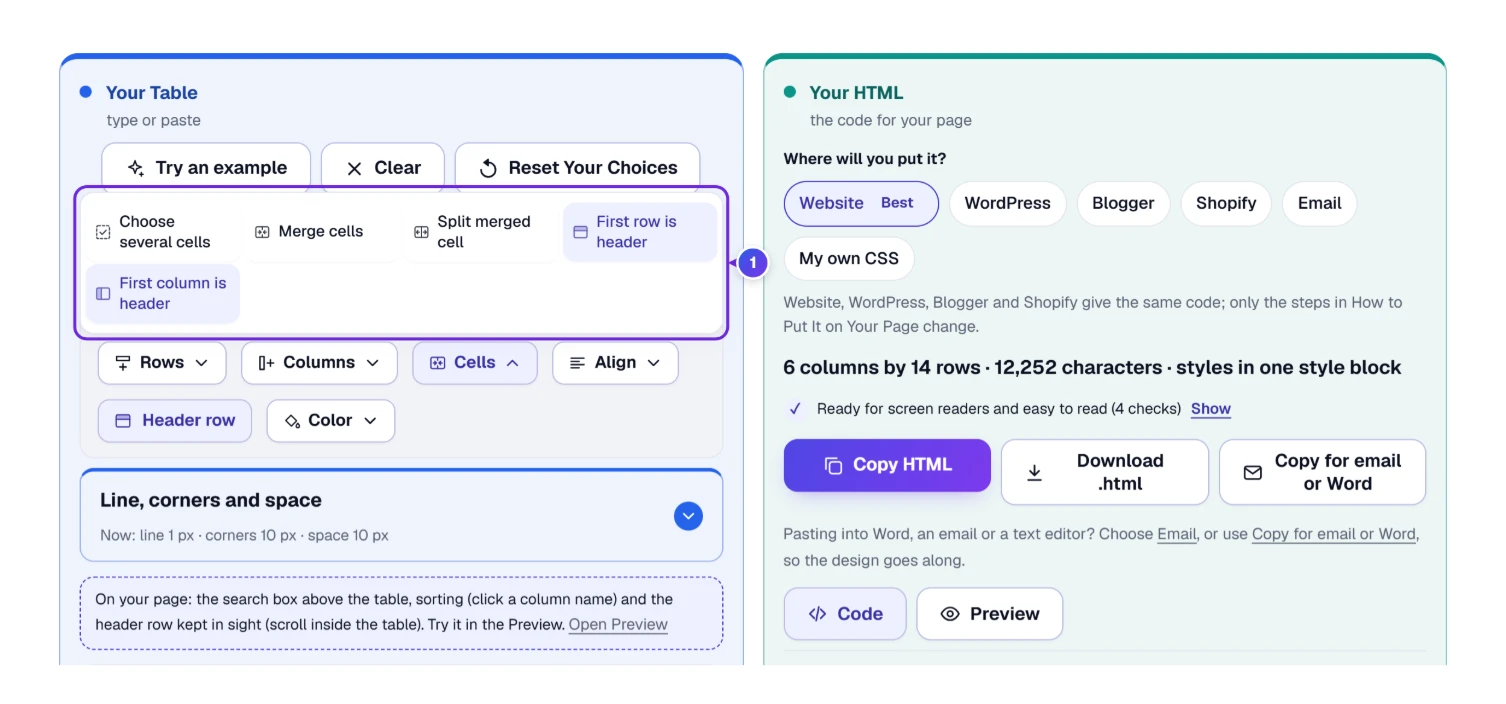
The Cells menu 1 holds five buttons:
- Choose several cells: tap it, tap the first cell, then tap the last cell. With a mouse, dragging across the cells works too.
- Merge cells makes the chosen cells one cell, and Split merged cell undoes it.
- First row is header turns the top row into header cells (<th>), so screen readers announce the column names.
- First column is header does the same for the left column, which helps when each row has a name, like a plot size.
We pasted a sheet with “Q3 Budget” merged across two columns. The code switched by itself from the simple scope labels to an id on every header and a headers list on every data cell. That is the method the W3C tables tutorial gives for tables with more than one header level. We also typed <b>Online</b> into a cell: it showed as typed and was written as safe text in the code, not as bold.
The Header row button in the toolbar is the quick version of the first switch, and the Align menu sets where the words sit in the chosen cells: left, center or right across, and top, middle or bottom up and down.
Finish Work: Colors, Bold Words and Fonts in Single Cells
Sometimes one cell needs to stand out: a late fee in red, a total in bold. Click the cell, then use the toolbar. B, I and U are bold, italic and underline (the usual Ctrl+B, Ctrl+I and Ctrl+U shortcuts work too). Size sets Small, Normal, Large, Huge or your own pixel size, and the font list has more than 50 choices, from Arial and Roboto to Playfair Display. With nothing chosen, Whole table shows that size and font apply to every cell.
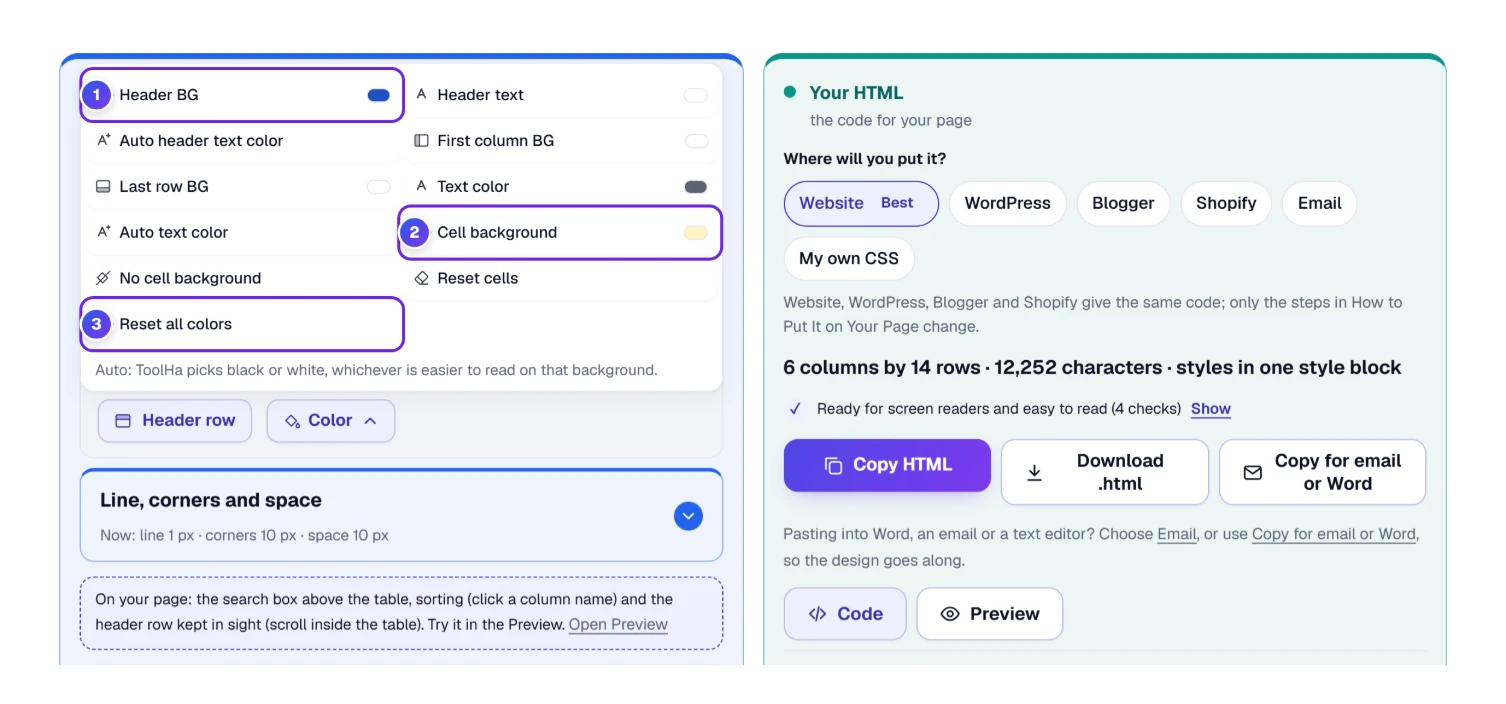
The Color menu covers the table as a whole and single cells. Header BG 1 sets the header background, and Header text, First column BG and Last row BG sit beside it. Cell background 2 and Text color work on the chosen cells. The two Auto buttons choose black or white words for you, depending on which stands out against the color behind. Reset all colors 3 puts every color back to the design, and Reset cells clears only the chosen cells.
A color you set on a cell beats the design. If you change designs later and one cell keeps its old color, that is why: choose it and press Reset cells.
Pick the Facade: 206 Ready-Made Table Designs
A design sets the header color, the stripes, the lines and the font all at once. Click Design, the first section inside Your Choices.
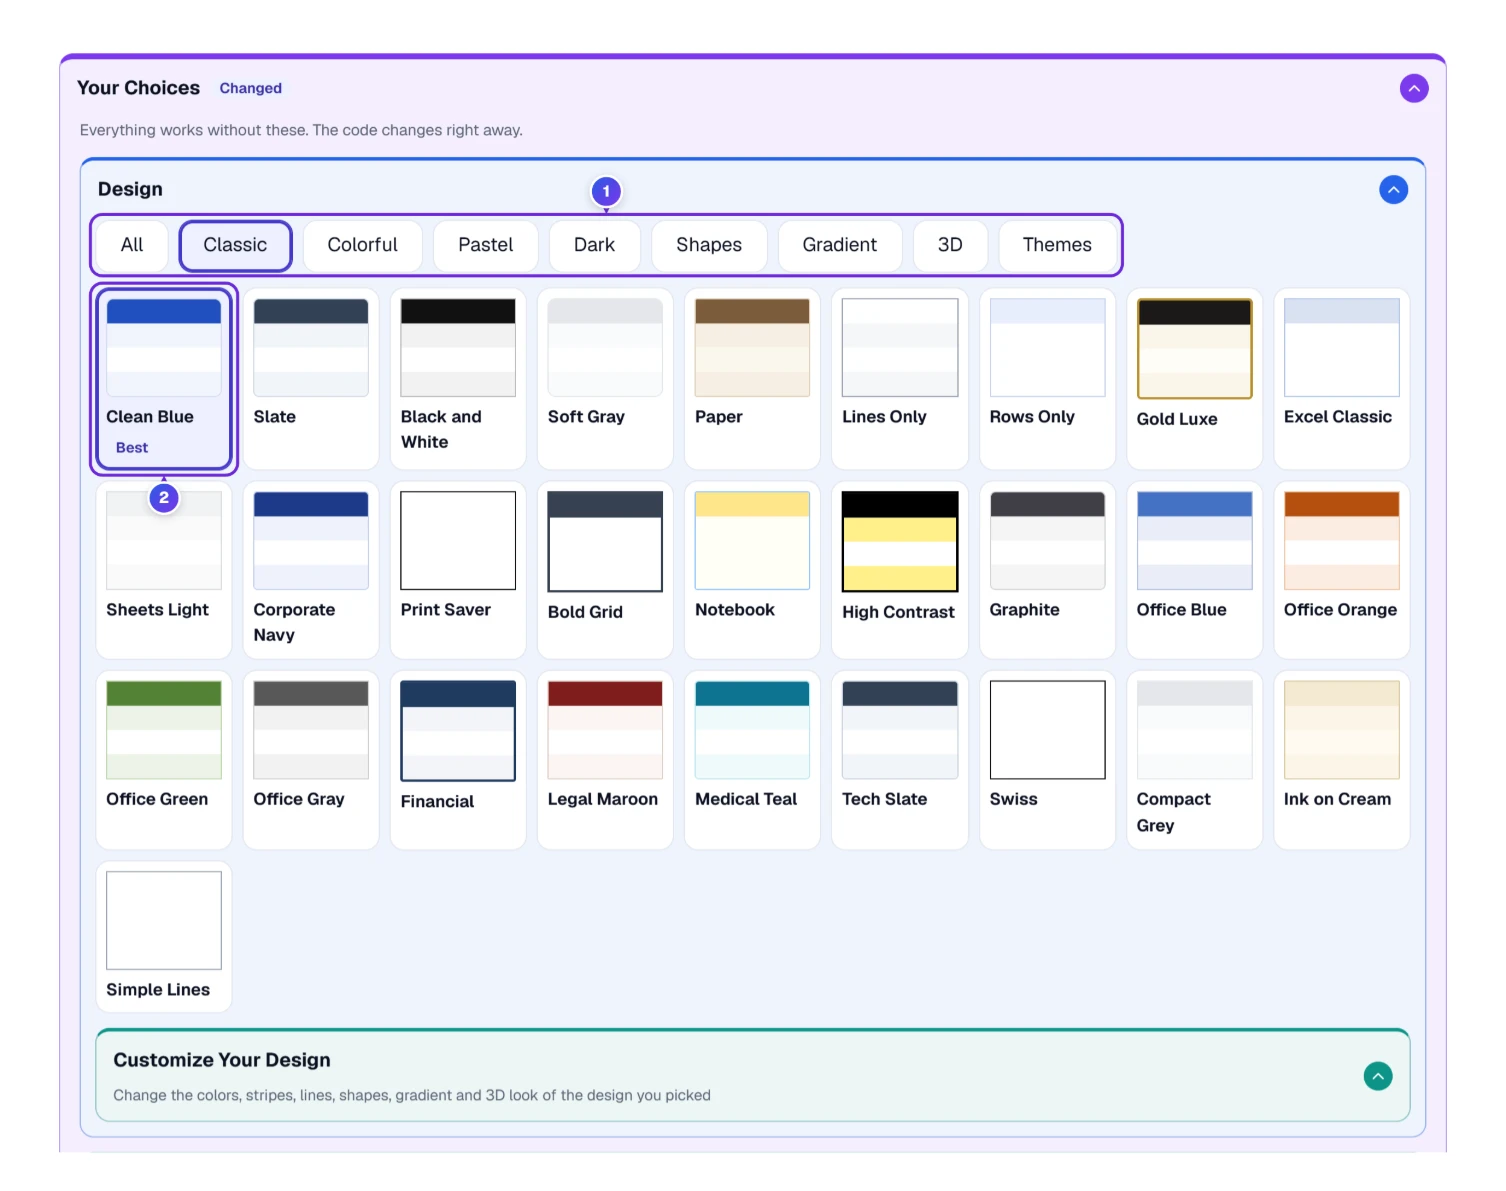
The row of tabs 1 splits the designs into groups: Classic, Colorful, Pastel, Dark, Gradient, Shapes, 3D and Themes, plus All. The design in use has a frame and a Best label when it is the default, Clean Blue 2. Clicking a design changes the table and the code at once, so you can click through a few and watch.
For a garden club page, a calm Classic design such as Clean Blue or Office Green reads well. A dark site may want one from the Dark group, and a party flyer can take a Shapes design with a wavy header.
Trim Work: Stripes, Lines, Header Edges and 3D Looks
Customize Your Design changes the design you picked, piece by piece, so you don’t need a new design for one new color.
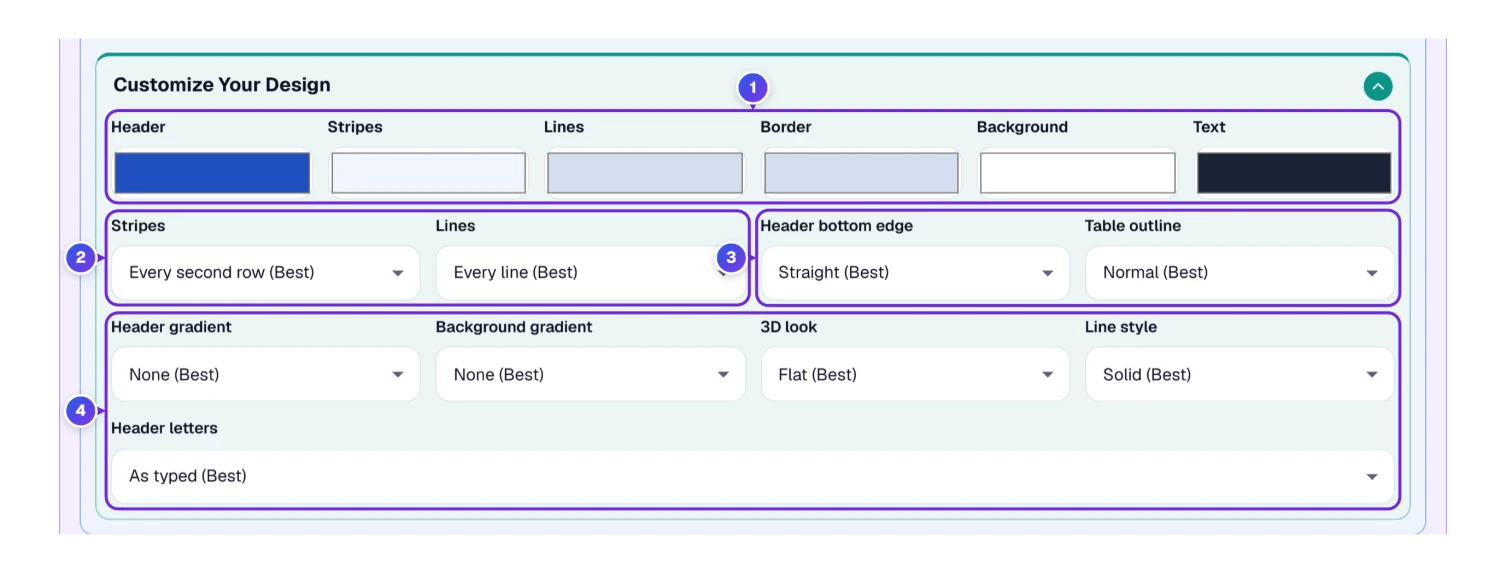
- 1 Six color boxes: Header, Stripes, Lines, Border, Background and Text.
- 2 Stripes can shade alternate rows (often called zebra stripes) or alternate columns, or stay off. Lines can run everywhere, only between rows, only between columns, or not at all inside the table.
- 3 Header bottom edge gives the header a straight, wavy, zigzag or castle-top edge, among others. Table outline adds ticket notches, cut or scooped corners or a folded corner.
- 4 Header gradient, Background gradient, 3D look (from a soft shadow to glass or soft clay), Line style (solid, dashed or dotted) and Header letters (as typed or CAPITALS).
Shaped header edges and table outlines need the code’s style block. Email apps can’t cut a table into a shape, which is why the generator tells you when it leaves those two out (more on that in the handover section).
Thin Lines or Thick, Square Corners or Round
Three sliders above the table handle the details people fiddle with most. Open Line, corners and space.
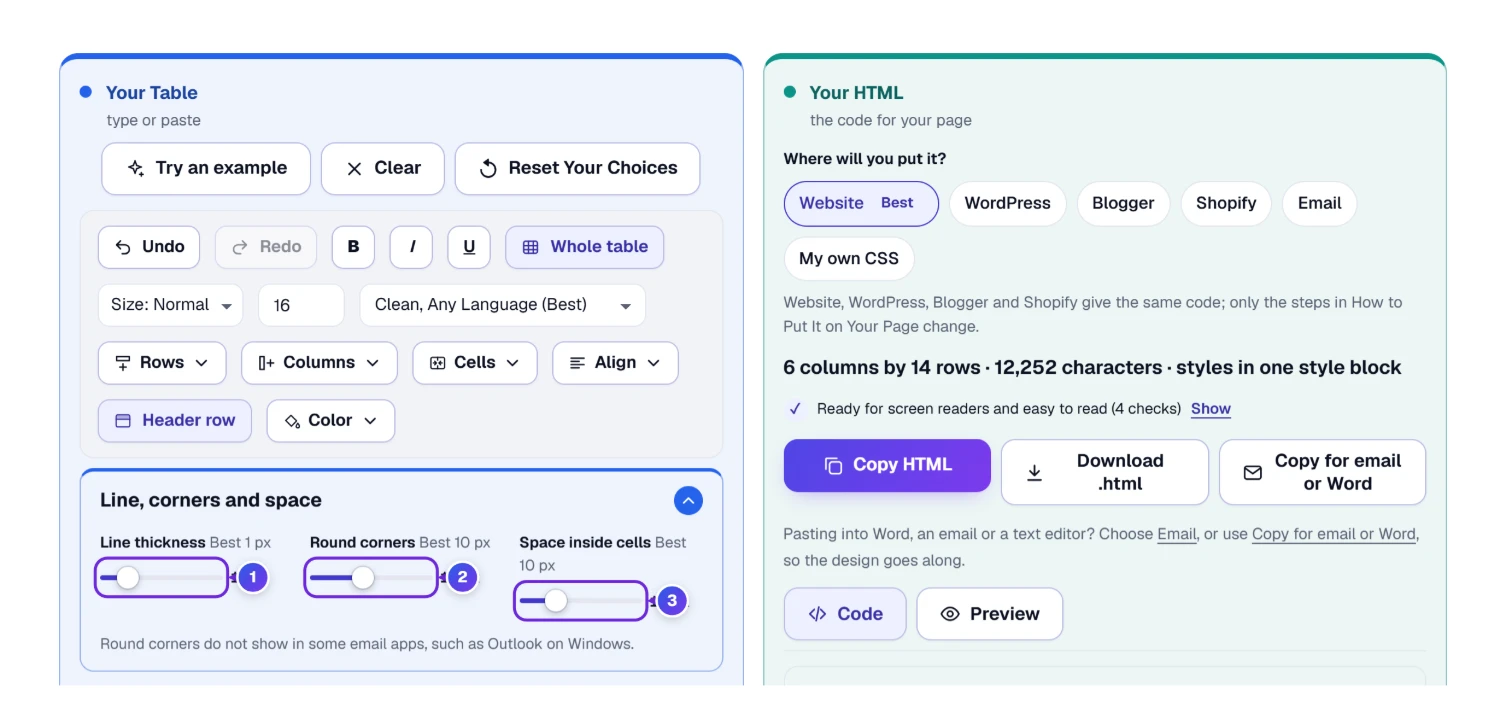
1 sets how thick the lines are, 2 rounds the corners, and 3 sets the space inside each cell, the padding between the words and the cell edge. When the bar is closed it still reads, for example, “line 1 px · corners 10 px · space 10 px”, so you can check the values without opening it.
Measuring Up: Table Width, Row Height and Small Screens
A table that looks fine on a laptop can overflow a phone. The Table Size and On Phones sections decide how much room the table takes.
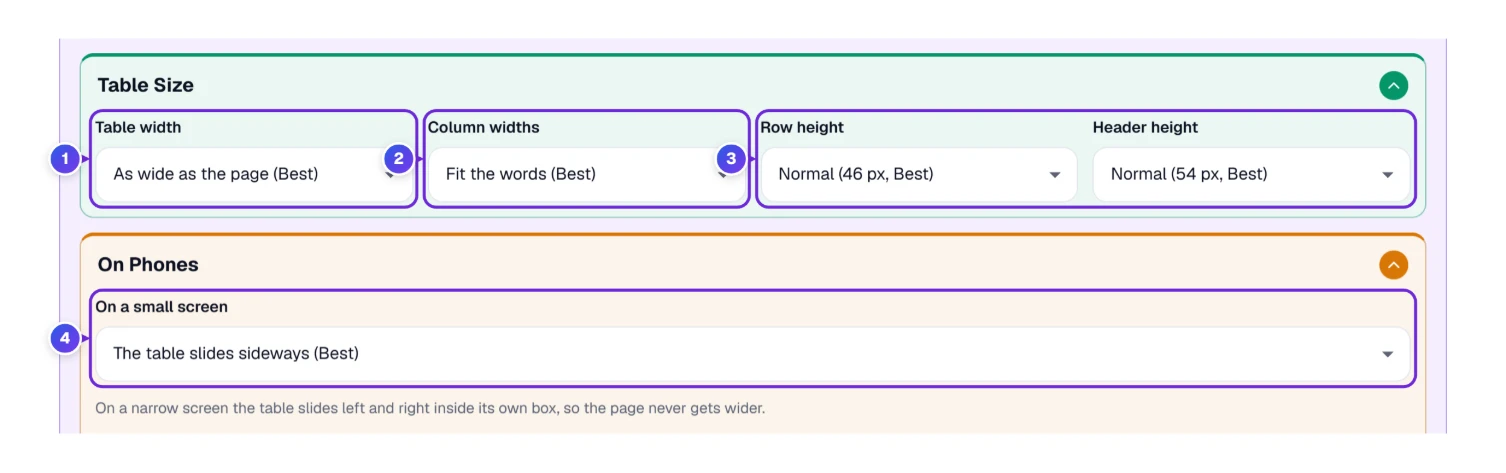
- 1 Table width: as wide as the page (the default), as wide as the words, 600 px for email, 800 px, 1000 px or a width you choose.
- 2 Column widths: fit the words, all the same, or set them yourself.
- 3 Row height from Tight (32 px) to Extra roomy (68 px), Normal is 46 px; Header height from 38 px to 76 px, Normal is 54 px.
- 4 On a small screen: the table slides sideways in its own box, each row becomes a card, or nothing extra.
The card choice is what people often call a responsive table. In our test with four US cities, the code gave every cell a data-label with its column name and added a rule for screens under 600 pixels wide. On a phone each row turns into a small card with the column name in front of each value.
The slide-sideways choice is the safe default for wide tables: the page never gets wider than the phone, and nothing is squeezed.
Wiring: The Code Options That Shape the HTML
This is the part a web developer cares about and most people can leave alone. Each choice changes the code on the right straight away.
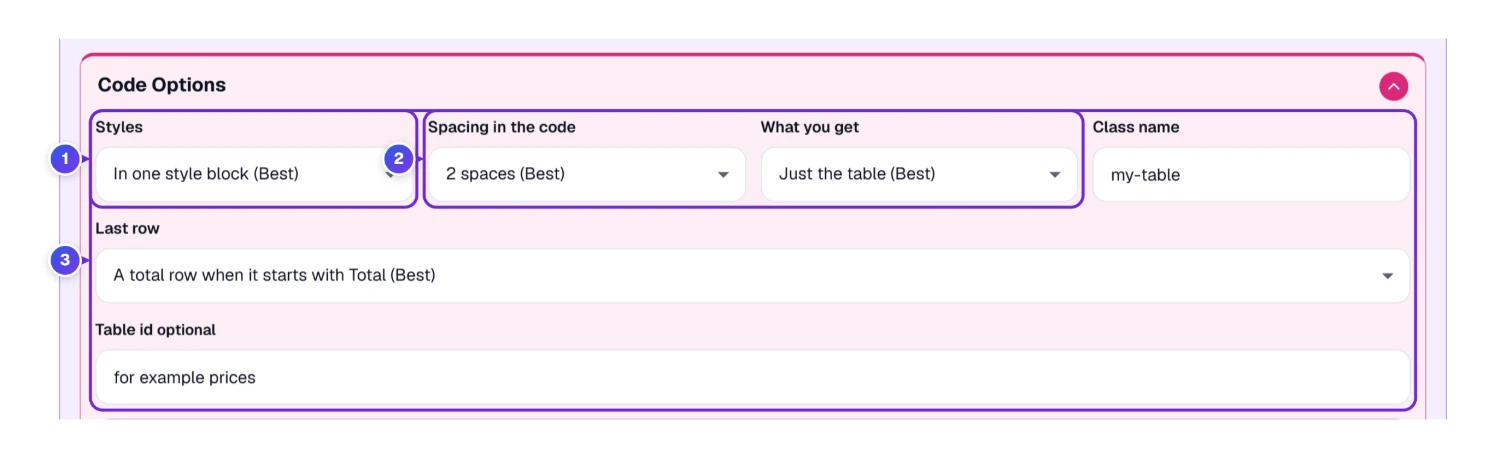
- 1 Styles: in one style block (the default), on every cell for email (often called inline styles or inline CSS), no styles so your site’s own look takes over, Bootstrap 5 classes or Tailwind classes.
- 2 Spacing in the code (2 spaces, 4 spaces, tabs or all on one line) and What you get: just the table, or a whole web page you can open on its own.
- 3 Class name (my-table unless you change it), Last row and an optional Table id.
Last row decides if the bottom row is a total row. By default a last row that starts with Total, Subtotal or Sum goes into a table footer (<tfoot>), so sorting leaves it at the bottom and a printed table can repeat it. You can also make the last row always a total row, or never.
Under these sit six switches. Keep the header row in sight makes a long table scroll in its own box with the column names fixed at the top (a sticky header). Sort by clicking a column name adds a small script. Add a search box puts a search field above the table. Ready to print is on by default. A dark version for dark screens follows the visitor’s phone or computer setting. Add the font link is only needed for a font that isn’t on every device.
Sorting is worth one test of your own. We built a table of four cities with populations written with commas: Boise 237,446, Austin 974,447, Denver 716,577 and Tampa 403,364. One click on Population sorted them Boise, Tampa, Denver, Austin, so the commas were read as numbers, not text. A second click reversed it. Typing “tx” in the search box left only Austin, and the hidden line for screen readers said “1 of 4 rows”.
Sorting and search need scripts. Most WordPress sites and a downloaded .html file run them, but some hosted platforms and email apps strip scripts out. The table still shows; only the clicking stops.
The Handover: Copy the Code, Download It or Send It in an Email
The right side, Your HTML, is where the finished table leaves the generator.
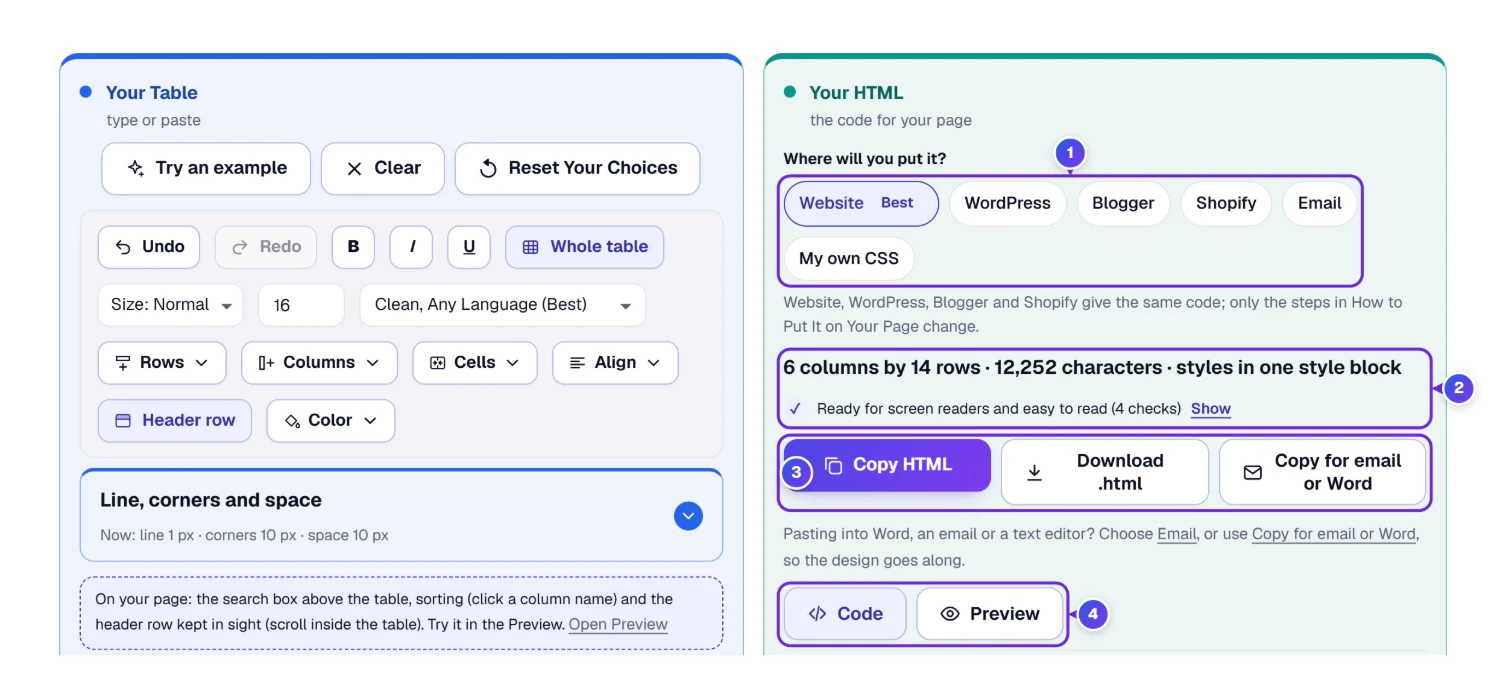
- 1 Where will you put it? Website, WordPress, Blogger and Shopify get the same code; only the steps in the how-to box change. Email switches the styles to every cell. My own CSS gives clean tags with no styles at all.
- 2 The summary line counts columns, rows and characters and says how the styles are written. Under it, the screen reader and color checks show how many passed.
- 3 Copy HTML (key C), Download .html (key D) and Copy for email or Word (key M).
- 4 Code shows the code. Preview (key V) shows the table as a page will, at phone, tablet or computer width, on a light or a dark page.
Copy for email or Word copies a finished table rather than code. Paste it into an email message or a Word document as it is, and the colors come along. Download .html names the file after your table; an untitled table of cities came down as city.html, after its first cell.
With Email chosen and a wavy-header design, the summary read “styles on every cell”, there was no style tag, and a short note under the buttons explained that the header edge and the outline of that design were left out because email apps can’t draw them. That note is worth reading before you send a newsletter.
Move-In Day: Put the Table on a WordPress, Blogger or Shopify Page
The last step happens on your own site. Open How to Put It on Your Page under the code, and the steps match the place you picked.
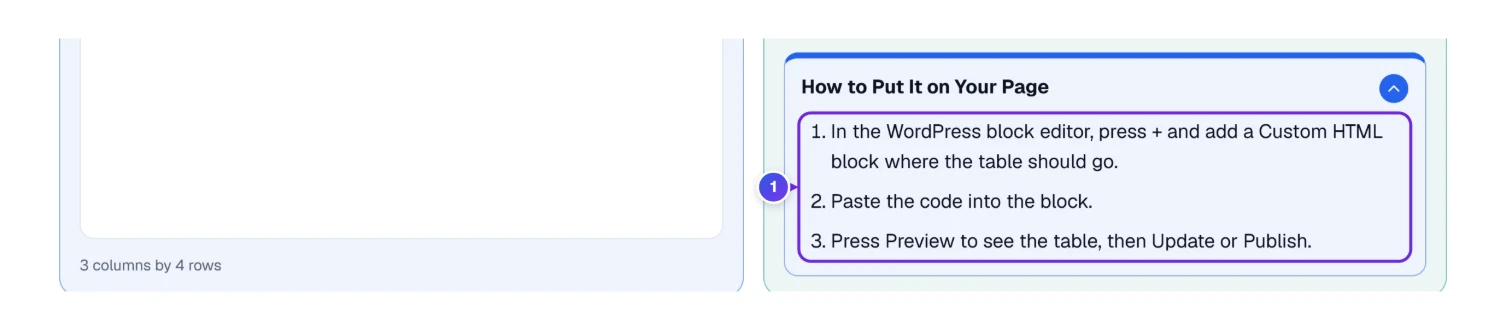
- In the WordPress block editor, press + and add a Custom HTML block where the table should go.
- Paste the code into the block.
- Press Preview to see the table, then Update or Publish.
The list 1 changes with the destination. Blogger and Shopify work the same way through their HTML view: in Blogger, switch the post to HTML view; in Shopify, press Show HTML (the <> button) in the text editor. For Email the box tells you to use Copy for email or Word instead of the code. With My own CSS the code has no styles at all, so your stylesheet decides the look.
Paste into the HTML view, never into the normal text view. In the normal view the editor shows the tags as text instead of drawing a table.
The Inspection: Contrast Warnings and Screen Reader Checks
Before the table leaves, the generator runs four checks: the header row is marked as headers, header cells say which way they read, the title is written as the table caption, and the colors are easy to read. Press Show next to the result line to see each one.

To test the color check, we gave one cell light gray text (#dddddd) on white. The warning 1 said “Some words may be hard to read. 1 cell has too little contrast with the color behind it”. Make them readable 2 changed the text to near black (#111827) and confirmed with “Done. Those words now use a color that is easy to read.”
Design colors get the same care. When we set the design’s text color to #c9c9c9, the code still came out readable, because the generator swaps a design text color that fails for a dark one. The rule it uses is the WCAG contrast rule: at least 4.5 to 1 for normal text, and 3 to 1 when the text is large.
What Stays in Your Browser, Including Your Last Few Tables
The generator reads your table and writes the code inside your browser. Your cells are not uploaded to a server while you work. Two things are saved in this browser for your next visit.

- 1 Your recent tables are buttons under the tool, named after each table’s title or first cell. One click brings that table back.
- 2 Clear empties the list from this browser and confirms it with “Your recent tables were cleared from this browser.”
- Your Choices (design, sizes, code options) are remembered too. Reset Your Choices puts them back to the defaults.
One more thing to know: copied code sits on your clipboard until the next copy. If others use this computer, copy any random word when you finish.
Saving the Generator, Sharing a Table and Keyboard Keys
Under the generator you’ll find a strip of buttons. Most people need one of them once, and then forget it exists.
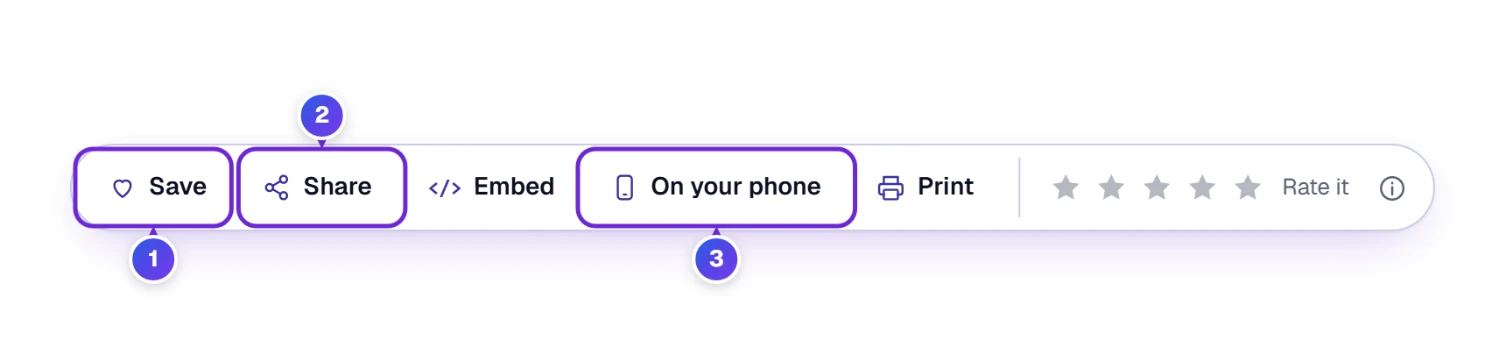
- 1 Save adds the generator to My Tools, so it is one click away next time.
- 2 Share opens Copy link, Copy result and More apps…, so a coworker can open the generator too.
- 3 On your phone draws a QR code; point your phone’s camera at it to load this page there.
- Embed gives code to place the generator on your own site, Print prints the page with your table, and the five stars are for your rating.
If you build tables often, single letters save trips to the mouse, provided your cursor sits outside the cells. Press the question mark key for the full list.
| Letter | Action |
|---|---|
| P | Pastes the table you copied (on this page P pastes rather than printing) |
| O | Opens a file |
| E | Loads the example table |
| U and Y | Undo and redo |
| C, D and M | Copy HTML, Download .html and Copy for email or Word |
| V | Switches to the Preview |
| W | Full screen, and back |
Small Screen, Same Blueprint: Building a Table on a Phone
On a phone the two sides stack: Your Table first, Your HTML under it. Your Choices is open at the top; one tap on its title folds it away and brings the table up.
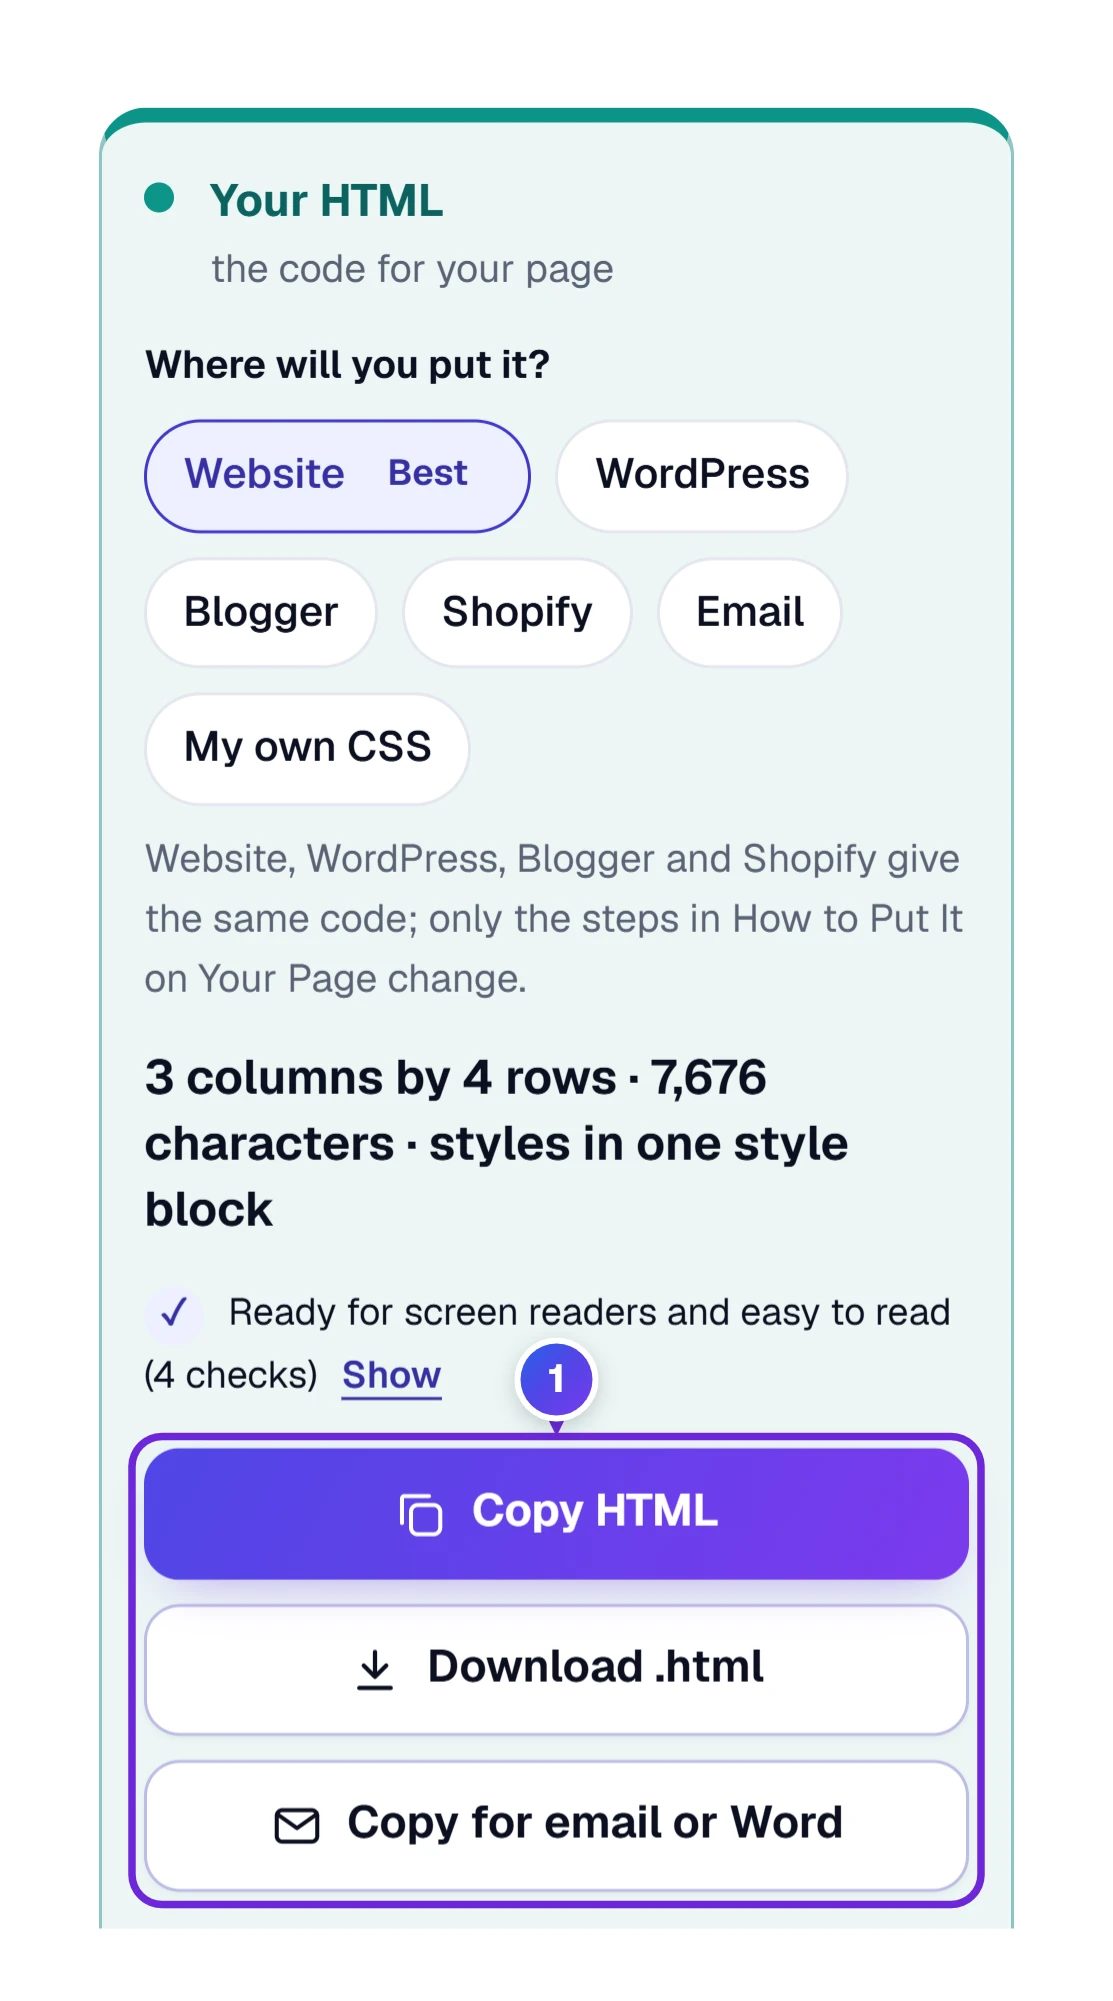
The three buttons 1 fill the width, one under another, so they are easy to hit with a thumb. The swap button that puts the code on the left is hidden on a phone, since there is no left and right, but Full screen stays. Tap a cell to type in it.
Building Codes: The Standards Behind Every Line of HTML
An HTML table generator should write the same code a careful developer would. Here is what ours follows, and why another tool may give you different code for the same table.
- The structure follows the HTML standard. The title above the table becomes a <caption>. Header rows go in <thead> as <th> cells, the other rows in <tbody>, and a total row in <tfoot>, as the WHATWG HTML Living Standard describes.
- Simple tables use scope; complex ones use id and headers. With one header row and no spanning header, each header cell gets scope. With more levels, every header gets an id and every data cell a headers list, the method in the W3C tables tutorial.
- Merged cells use colspan and rowspan. The HTML standard allows up to 1,000 columns and 65,534 rows in one span. This tool stays far inside that, because it holds 30 columns and 300 rows.
- Every character is escaped. &, <, >, ” and ‘ are written as their safe codes, so your text shows exactly as typed and can never run as code.
- Nothing is rounded. The code shows what you typed: no commas added, no zeros dropped. 42.50 stays 42.50, and 2219791 stays 2219791.
- Colors follow WCAG 2.1, success criterion 1.4.3. Contrast is (L1 + 0.05) / (L2 + 0.05), where L is the brightness of each color; the tool asks for 4.5 to 1.
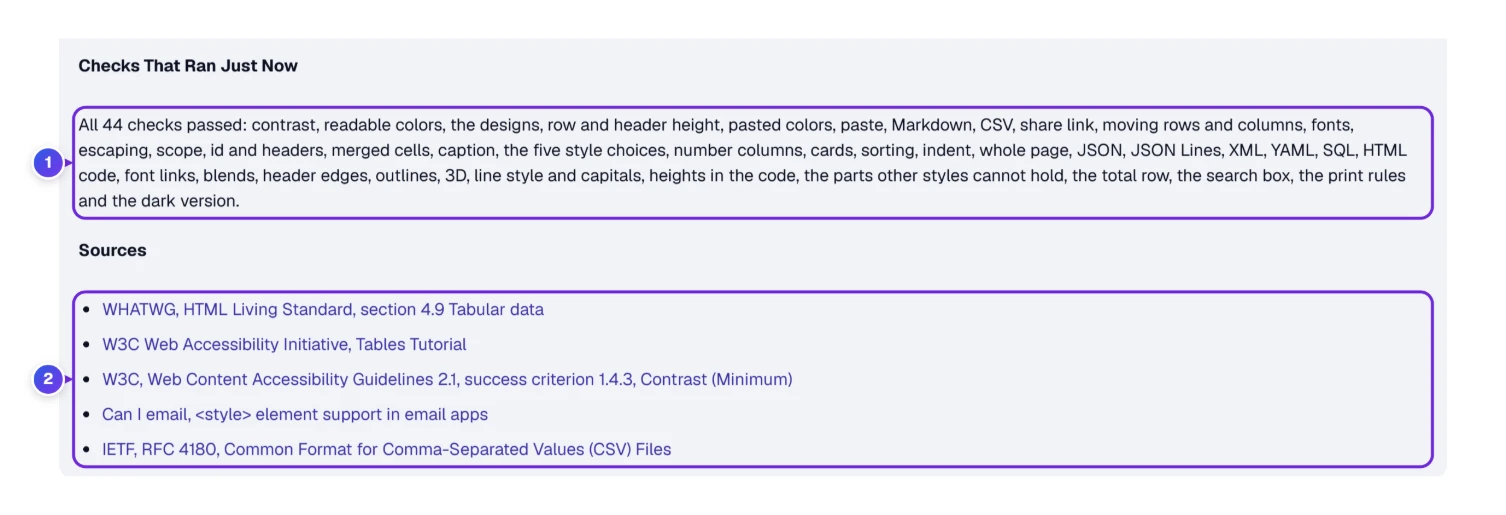
On each visit the page tests itself: 44 small checks run through the very code that builds your table, from contrast and merged cells to the total row and the dark version. The box under the generator, How We Write Your Code, lists the result 1. When everything passes, the line reads “All 44 checks passed”. The sources the rules come from are listed under it 2.
Why another generator may differ: some write every style on every cell, which bloats web code, or use old attributes such as border=”1″ and bgcolor that the HTML standard no longer recommends. Some don’t add scope or a caption at all. None of that breaks a quick test, but it makes web code heavier and gives screen readers less to work with.
Punch List: When the Table on Your Page Looks Off
| On your page or in the tool | Why it happens | The fix |
|---|---|---|
| The tags show as text on your page | The code went into the normal text view | Paste into a Custom HTML block or the HTML view |
| The table looks plain, with no colors | Your site or editor removed the style block | Choose Styles: On every cell, then copy again |
| Sorting or search does nothing | The platform strips scripts | Leave those switches off there; the table still shows |
| The table is wider than the phone | On a small screen is set to Nothing extra | Pick The table slides sideways or Each row becomes a card |
| Colors vanished in the email | Website code was pasted into the email | Use Copy for email or Word, or choose Email first |
| Copy HTML says “Your browser would not copy” | This browser blocks pages from writing to the clipboard | Click in the code, select all with Ctrl+A, copy with Ctrl+C |
| A comma split one column into two | The CSV file has no quotes around a cell with a comma | Paste from the spreadsheet instead, or put quotes around that cell |
Short Answers Before You Break Ground
How Do I Convert an Excel Table to HTML?
Select the cells in Excel, copy, and paste into the generator, or open the .xlsx file with Open file. Pick a design and press Copy HTML. Every sheet in the file shows as a button, so you can switch to another sheet.
Can I Turn Google Sheets Into an HTML Table?
Yes. Choose the cells in Google Sheets, copy with Ctrl+C (Cmd+C on a Mac), then paste into the generator. The first row becomes the header, and number columns line up on the right on their own.
How Do I Add a Table to a WordPress Post?
Pick WordPress under Where will you put it, copy the code, then add a Custom HTML block in the block editor and paste it there. Press Preview to check, then Update or Publish.
How Do I Make an HTML Table Work in Gmail or Outlook?
Choose Email as the destination, which writes the styles on every cell. Then press Copy for email or Word and paste into the message. Shaped header edges and outlines are left out, because email apps cannot draw them.
How Do I Merge Cells in an HTML Table?
Open the Cells menu, press Choose several cells, tap the first and the last cell, then press Merge cells. The generator writes the colspan or rowspan for you and links the cells to their headers.
How Do I Make a Table Fit on a Phone?
Open Table Size and On Phones. The table slides sideways keeps the page from getting wider; Each row becomes a card stacks every row as a small card with the column names. Check the result in Preview at Phone width.